Deploying a Web Server with AWS: A Hands-On Approach
Build a reliable and safe web server using EC2 instances, Nginx, and a private network.

Prince is a technical writer and DevOps engineer who believes in the power of showing up. He is passionate about helping others learn and grow through writing and coding.
Introduction
Web servers play a very vital role in our technologically driven world. They make it possible for users to access websites over the internet. They are the backbone of the internet, as they act as a bridge connecting users with the content they are trying to access.
There is a rise in the use of cloud providers to deploy web servers. This increase in usage is not a surprise as they offer many advantages, such as scalability, flexibility, automation, security, and high availability.
Many cloud providers are available today, examples of which are Amazon Web Services (AWS), Google Cloud Platform (GCP), Azure, DigitalOcean, etc. This article will focus on using AWS to deploy the Nginx web server. We will also cover essential system admin practices such as using a configuration management tool - Ansible and setting up an Application Load Balancer (ALB) in AWS.
Prerequisites
This article aims at those with previous experience with AWS and a background in working with web servers. However, those individuals don't have to be experts in these, as this article will be a step-by-step guide to deploying a web server using AWS.
The technical know-how of the following tools is necessary to understand the content of this article:
An AWS account. To sign up, visit the AWS console.
Basic knowledge of Linux and its command line interface.
Basic understanding of networking concepts like IP addresses and subnets.
Project Overview
This article will guide you in deploying the Nginx web server on AWS. However, there is a slight twist to how we will achieve this. We will use the following tools to achieve the goal of this project:
Virtual private cloud (VPC). It will isolate our server from being accessed outside our network.
Two private EC2 instances. They will serve as our virtual machines.
Ansible. It will help us manage our EC2 instances.
An application load balancer (ALB). It will distribute traffic among our EC2 instances.
The EC2 instances will be launched in a VPC. We will then install and configure Nginx on these newly created instances using Ansible. Nginx has a default page, which we will update to display the hostnames of each EC2 instance. Distributing traffic between the two EC2 instances using the ALB allows us to see their hostnames.

Figure 1. The outcome of this project.
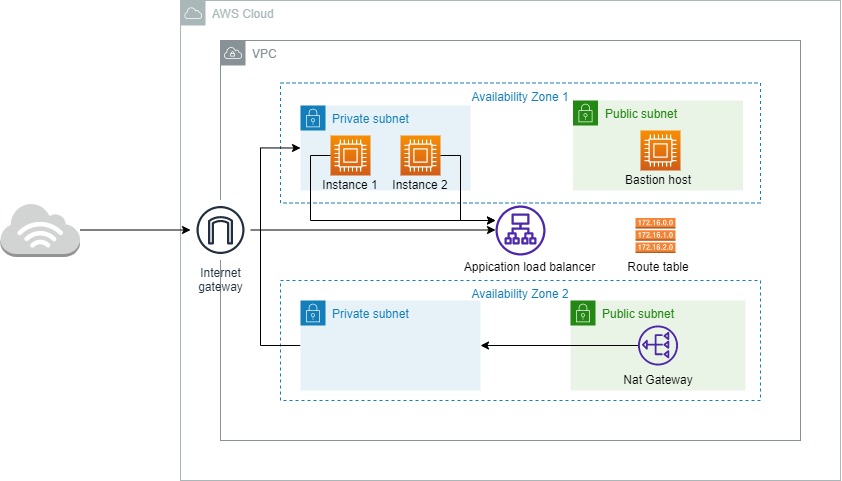
Figure 2. Architectural diagram of this project.
The following are the goals for this project:
Launch two private EC2 instances and define a logical network for them.
Deploy an Nginx server on each EC2 instance and then display the hostname of each EC2 instance on those servers.
Access the Nginx web server through the ALB domain name.
With that in mind, we will break down this project into three steps. Don't worry about confusing concepts; I will explain everything as we proceed.
Step 1: Launch the Instance
This step deals with setting up the instances on AWS, and the goals of this step include the following:
Set up a VPC.
Launch two private EC2 instances.
Connect to the instances via a bastion host.
Before we achieve our goals for this step, let us take a detour and take the definitions of the various services we are about to use.
Definitions
A VPC is a user-defined private network in the AWS cloud where you can launch resources accessible only within that network. It is isolated from other virtual networks in the AWS cloud.
The VPC is similar to our standard internet connection because it is assigned an IP address. It can connect to the internet through the internet gateway and has security just like our regular internet firewalls. The main difference is that the VPC can only be accessed when you are within its network.
The EC2 instance is a virtual server available in the AWS cloud. It is a virtual machine that we can configure with various operating systems.
Think about having a virtual macOS or Linux machine without worrying about hardware. With these virtual machines, you can configure many settings as you wish, such as CPU, type of OS, memory, etc.
We can access the EC2 instances via SSH.
Bastion Host
A bastion host is an EC2 instance that has a specific purpose.
In a VPC, we use a bastion host to connect to our private EC2 instances. When you have private instances in a VPC, you cannot access these instances via SSH. The reason is that they do not have public IP addresses, so the bastion host must be created and placed in a public subnet.
A bastion host is also known as a jump server.
Now that we have these definitions out of the way, we can refocus on achieving the goals for this step. Let's begin with setting up our VPC.
We can use the following steps to set up a VPC in AWS:
Login to your AWS console and navigate to the VPC service.
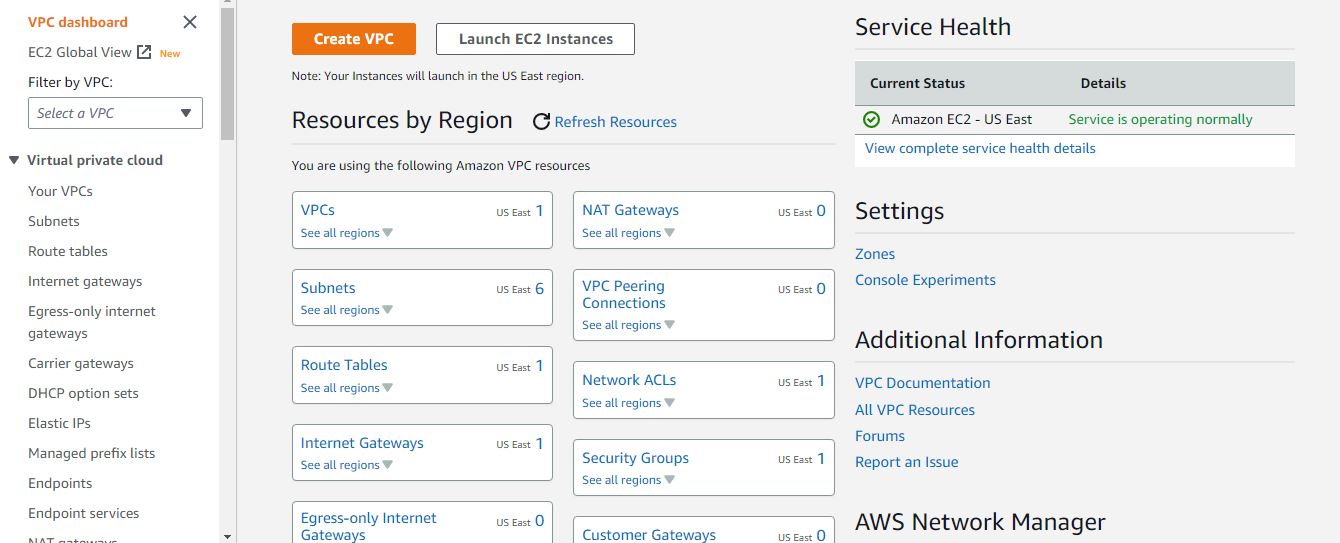
Figure 3. AWS VPC console.
Click on the create VPC button in Figure 3 and follow the directions shown in the following images below.
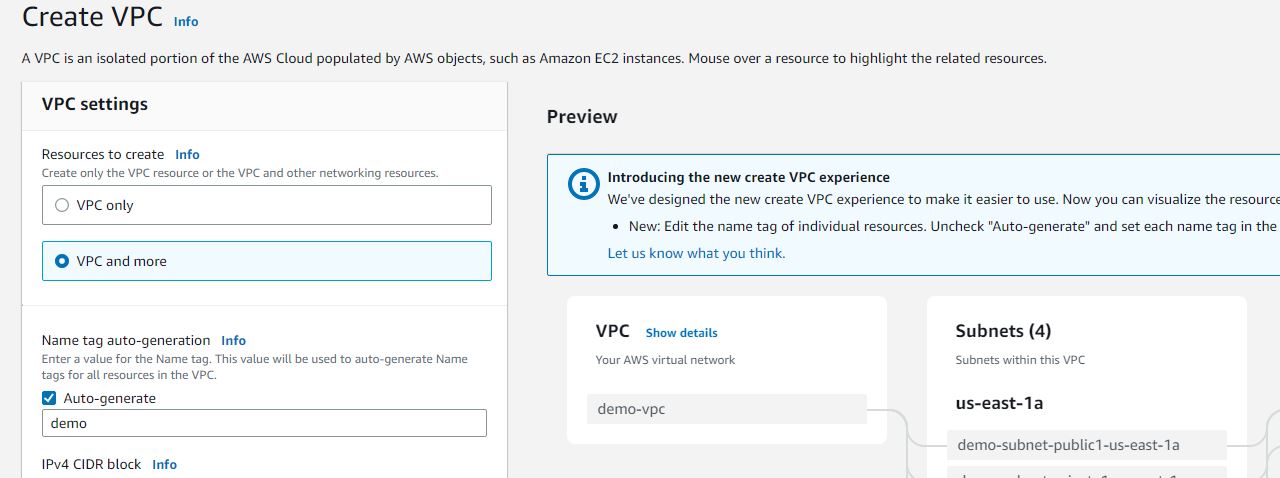
Figure 4. Create VPC step 1.
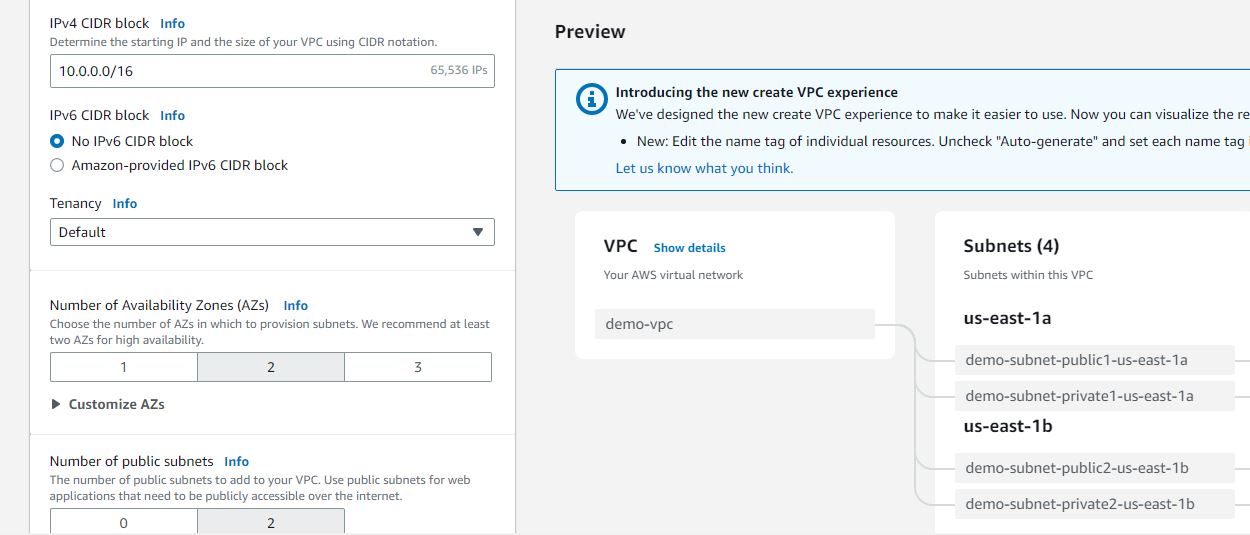
Figure 5. Create VPC step 2.
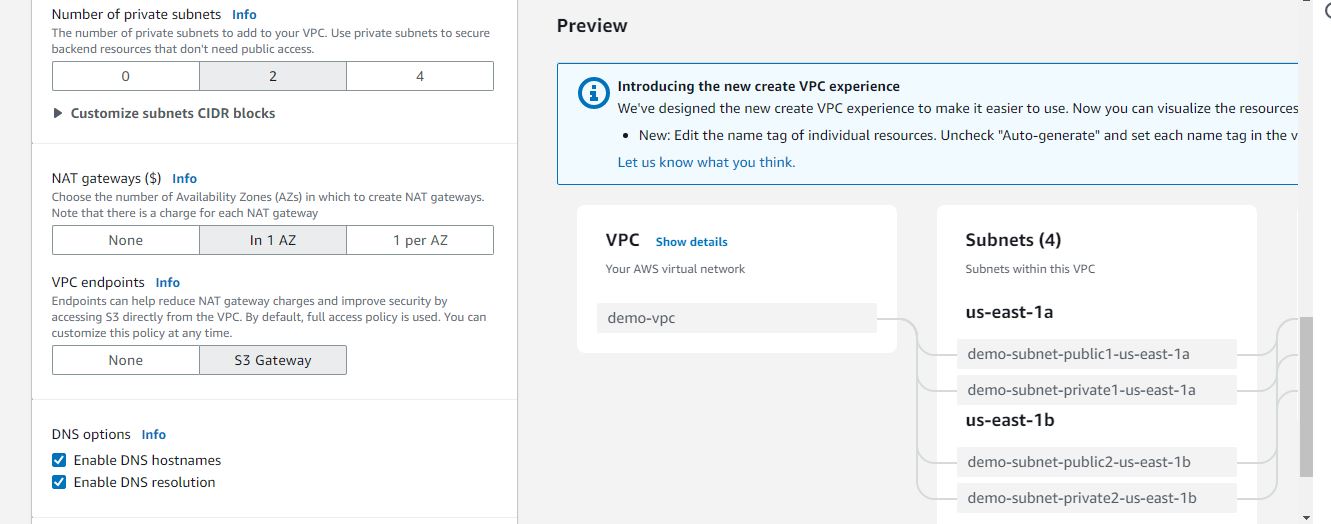
Figure 6. Create VPC step 3.
Once you're done, you should ensure your connection looks like this before clicking on create VPC.

Figure 7. Confirm VPC configuration.
With that, we have completed our VPC. We move on to the next goal - creating private EC2 instances.
Use the following steps to set up an AWS private EC2 instance:
Navigate to the EC2 instance console and click on the launch instance button.
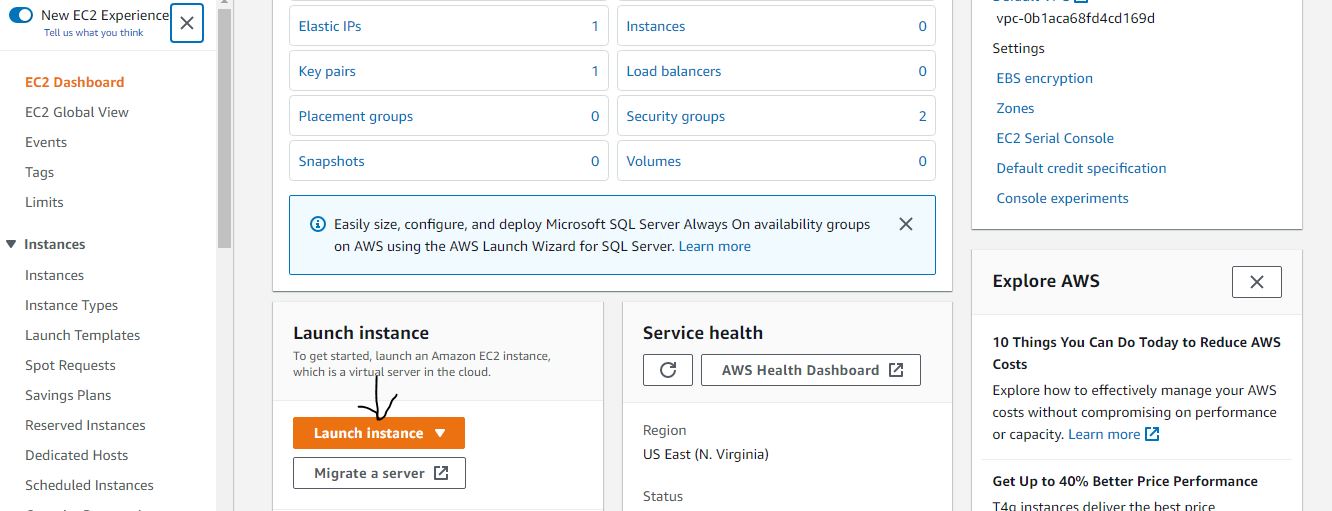
Figure 8. EC2 instance console.
The following steps are the configurations we will use in this project.
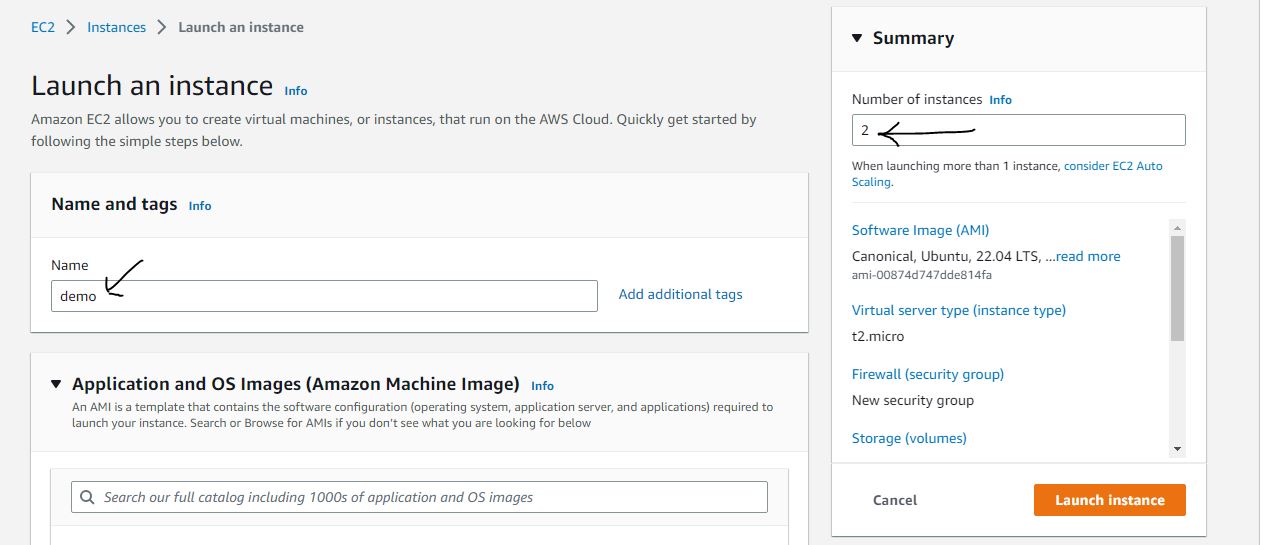
Figure 9. Set up EC2 instance step 1.
In figure 9, we set the names of our instances to demo and indicate that we are creating two instances with the same configurations.
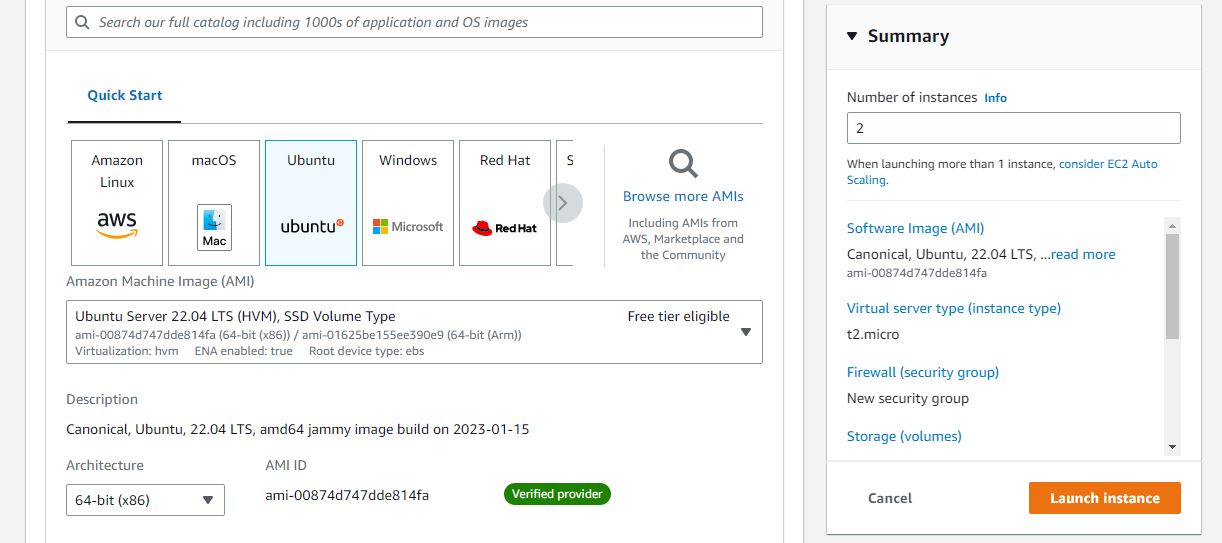
Figure 10. Set up EC2 instance step 2.
We chose Ubuntu, which is a free-tier instance.
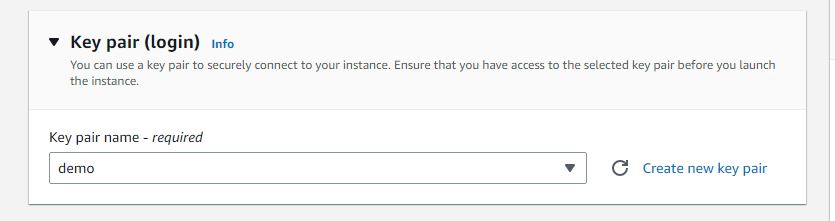
Figure 11. Set up EC2 instance step 3.
Select an existing key pair, or generate a brand-new key pair. It will automatically download to your PC once you create it.
If you want to make a new key pair, follow the steps below.
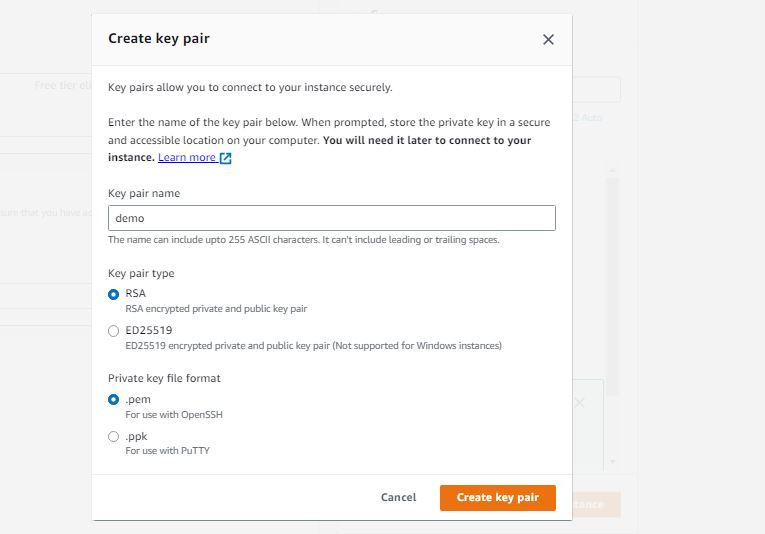
Figure 12. Set up EC2 instance step 4.
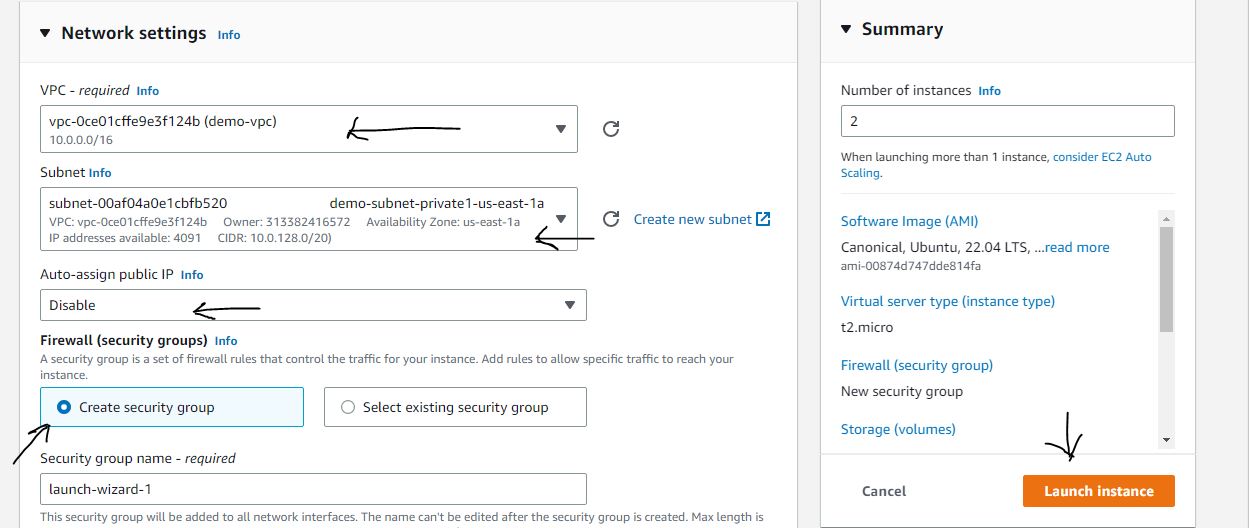
Figure 13. Set up EC2 instance step 5.
Configure the network settings to look exactly like the one above, choose the VPC we created earlier, and launch the instance. With this, we have created our private instance.
We can only connect to these instances once we have our bastion host, so let's do that now.
Navigate to the EC2 instance console again, click the launch instance button, and follow all the steps shown below.
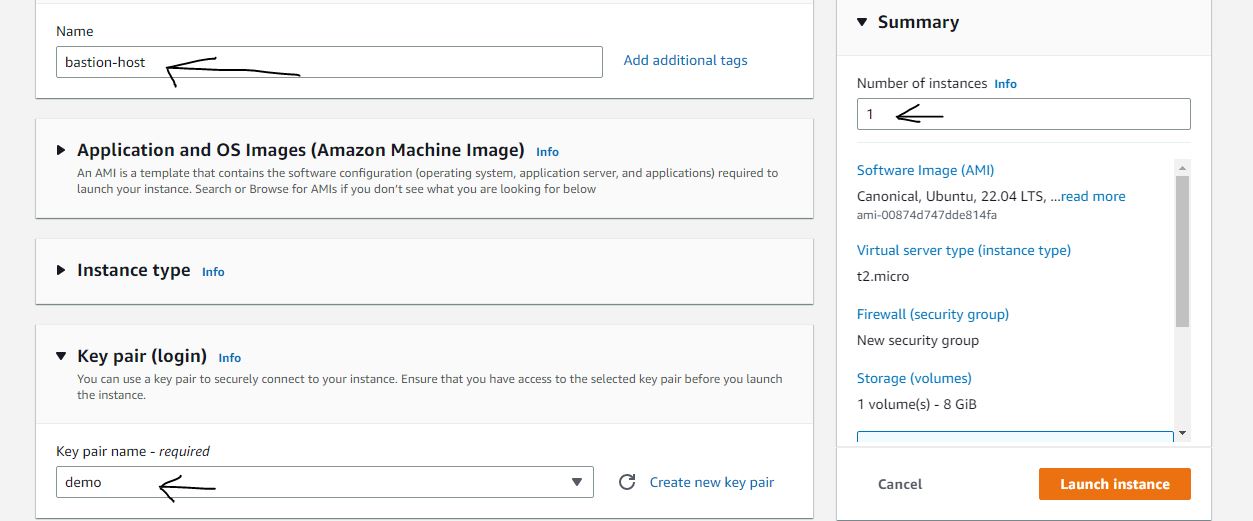
Figure 14. Create Bastion host step 1.
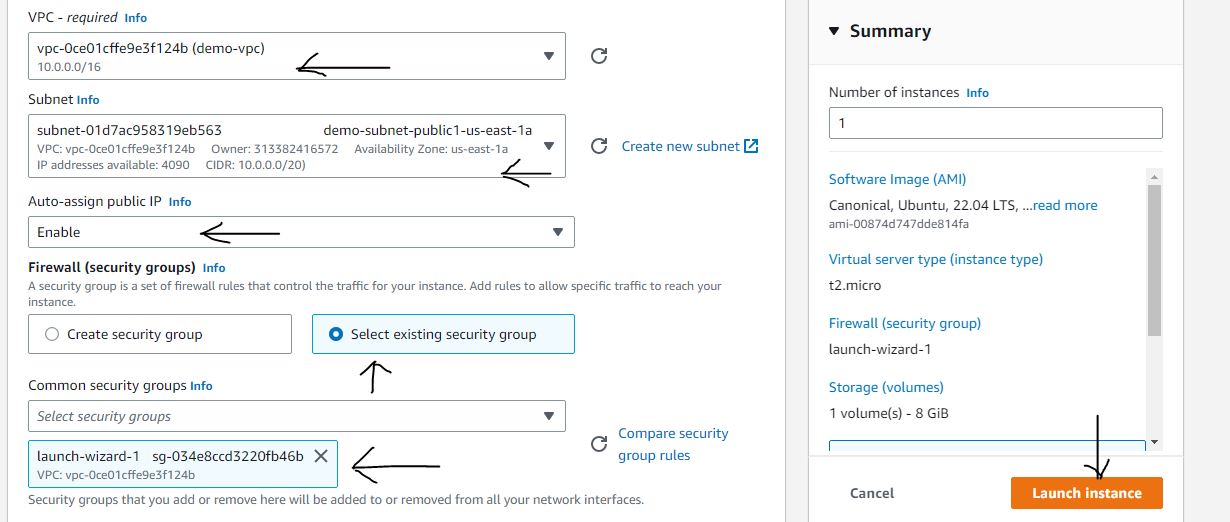
Figure 15. Create Bastion host step 2.
If you followed the configurations shown in Figures 14 and 15, congratulations, you have created the bastion host. Let's navigate to the console to see our instances.
Your instance should look like figure 16.
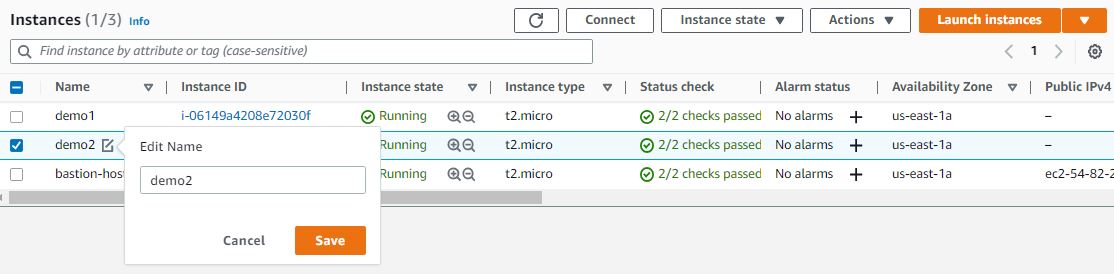
Figure 16. Check EC2 instances.
To differentiate between the two EC2 instances we created earlier, we have to change the names, adding the numbers 1 and 2 to each of them, respectively. Hover over each instance to change the name, as seen in figure 16.
Now that we have our VPC, EC2 instances, and bastion host setup, let us connect to the bastion host via SSH.
We can use the following steps to connect to instances:
Open the command prompt. You can use the shortcut Windows + R and type
cmdin the run dialog.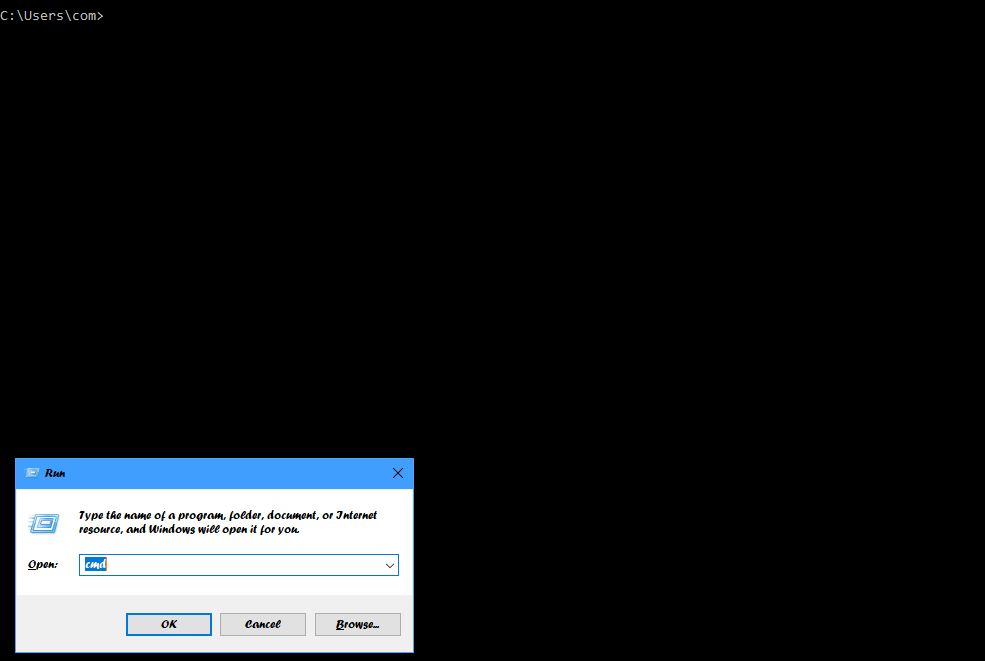
Figure 17. Open the command prompt.
Navigate to your downloads folder or where you stored the
demo.pemSSH key we created earlier. We will use the code below to navigate to the downloads folder.cd DownloadsNavigate to the AWS EC2 instance console, click on the bastion host instance, and click the connect button as shown in Figure 18 below
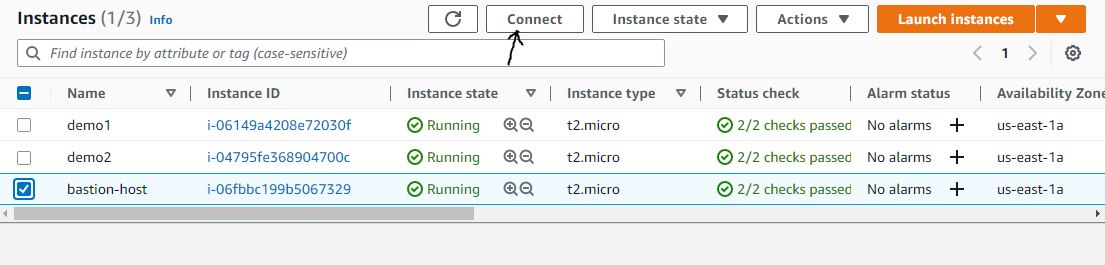
Figure 18. Connect to the bastion host.
Navigate to the SSH client tab and copy the example of connecting to the instance.
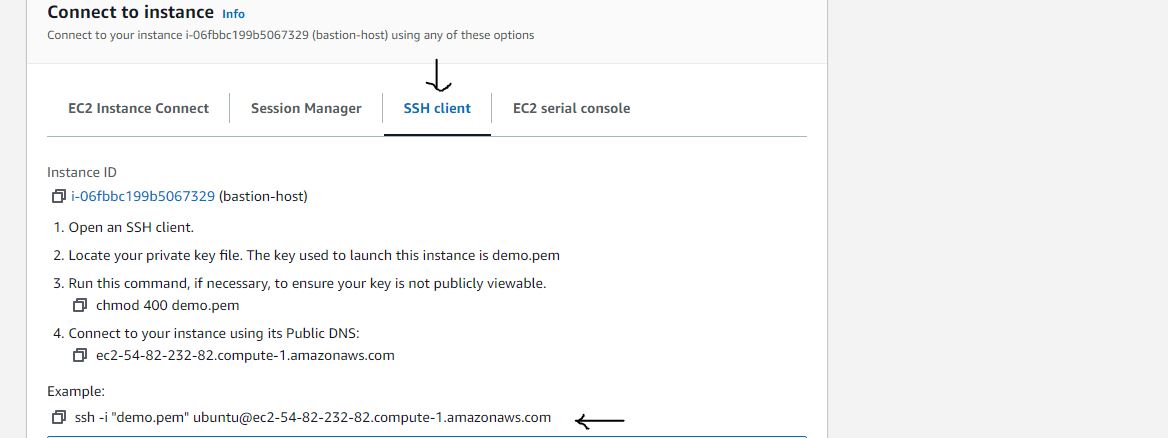
Figure 19. Copy the SSH example.
Paste the example SSH code into the command prompt. Make sure you are in the folder where you stored the
demo.pemkey.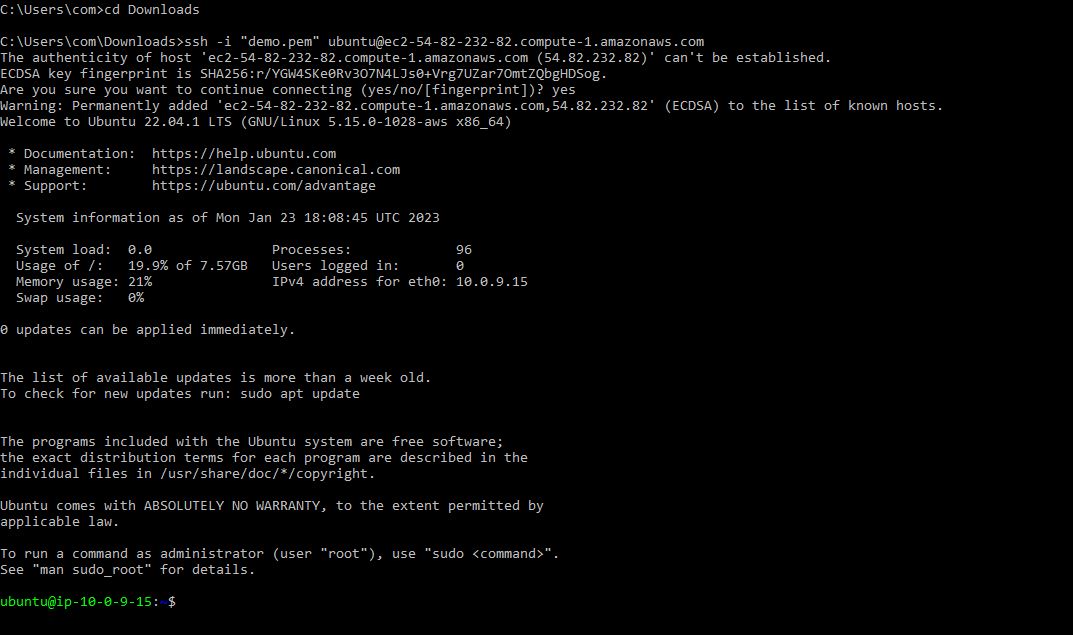
Figure 20. Connect via SSH to the bastion host.
With that, press the enter key on your keyboard, answer yes to the prompt, and voila, you have connected to the bastion host.
Since the purpose of the bastion host is to act as a connecting bridge to the private EC2 instances, we will now have to connect to the EC2 instances.
The following steps will aid you in carrying out that task:
Copy the content of the
demo.pemkey, open a file with the same name in your virtual machine (bastion host), paste the content in that file, and save it.#open the nano text editor sudo nano demo.pemIn the AWS instance console, please navigate to the first instance, click the connect button, and copy the code to connect to it via SSH.
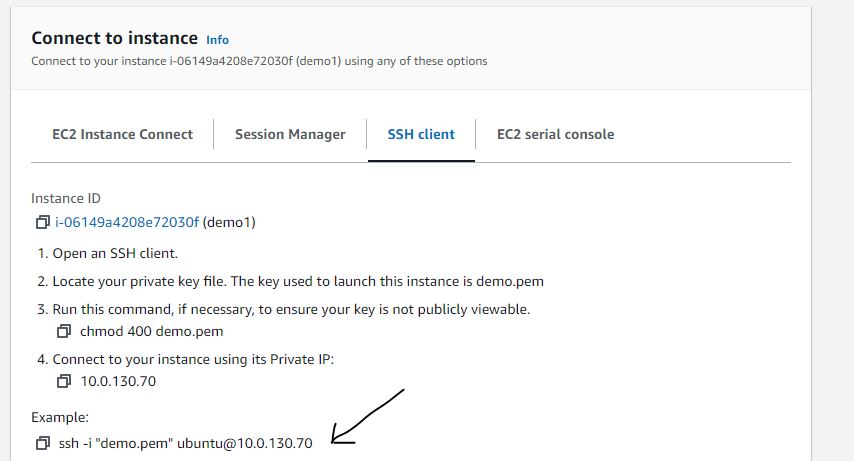
Figure 21. Copy the SSH example.
Paste the code into the bastion host; voila, you have connected to the
demo1EC2 instance. You can do the same for the second instance.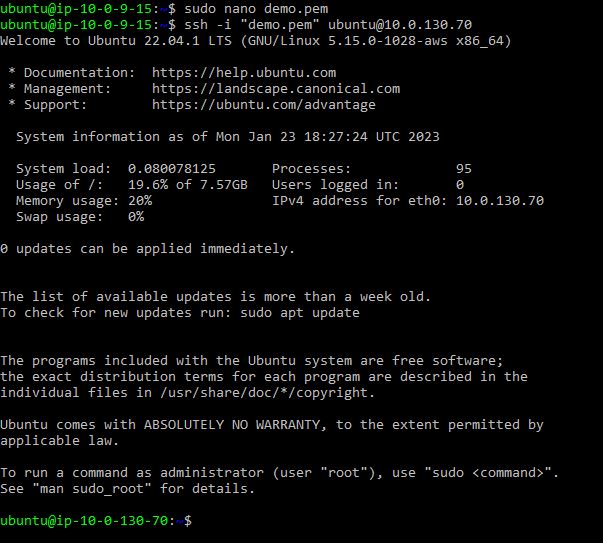
Figure 22. Connect to
demo1EC2 instance.
We are now done with step one of our project, and we hit all the goals we set for this step. Let's now move to step two, where the real fun starts.
Step 2: Install the Nginx Server
This step deals with installing the Nginx web server on our instances. The goals of this step include the following:
Setup Ansible.
Add the configuration files to install Nginx.
Before we achieve our desired goals for this step, let us retake a detour to talk about the service we are about to use: Ansible.
Ansible is an infrastructure as code (IaC) tool that handles configuration management. It manages the resources on our remote servers (private EC2 instances). It automates all the configurations we want on our instances.
The configurations written in the ansible file are in YAML. We will set up ansible on our bastion host and create our configuration file, which we will use to install Nginx on our two EC2 instances.
The following procedure can be used to setup ansible on our bastion host:
Install ansible on your Bastion host instance. We will use the following lines of code to carry this out.
 sudo apt update
 sudo apt install ansible -y

 #use the following command to check if ansible has been installed
 ansible --version
Open the host file and add the IP addresses of the EC2 instances. Log on to AWS and get the IP addresses of the private instances.
 #open the hosts' file
 sudo nano /etc/hosts

 #add the IP addresses
 [demo1 IPaddress] altschoolServer1
 [demo2 IPaddress] altschoolServer2
Navigate to your
.ansiblefile and set up thehost inventoryfile - this file is used to hold the IP addresses or host names of the remote servers (EC2 instances).cd ~/.ansible [server1] altschoolServer1 [server2] altschoolServer2We will generate an SSH key from our bastion host to allow ansible to connect to our private instances.
 cd ~/.ssh
 ssh-keygen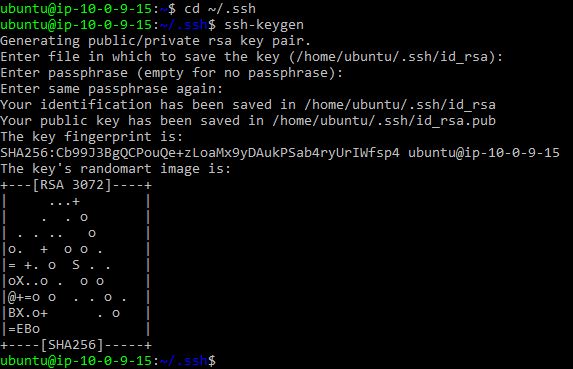
Figure 23. Generate SSH key.
Navigate to the location of the newly generated key, and copy the key we just generated.
cat ~/.ssh/id_rsa.pubSSH into the private instance, navigate to the
authorized_keysfiles inside the.sshfolder, and paste the newly generated key.cat >> ~/.ssh/authorized_keysLet's create a
rolesfolder in the.ansibledirectory. This folder will contain modules of our configuration, allowing us to have a very neat playbook (more about this later). Therolesfolder will have this structure./roles nginx main tasks main.yml php main tasks main.ymlCreate a folder structure like the one above and add the following lines of code to the first
main.ymlfile.#module to install and configure nginx --- - name: Update package manager's package list apt: update_cache: yes - name: ensure Nginx is at the latest version apt: name=nginx state=latest - name: start Nginx service: name: nginx state: started - name: Setup Nginx conf template: src=nginx.conf.tpl dest=/etc/nginx/nginx.conf - name: restart Nginx service: name=nginx state=restartedThis playbook will ensure that Nginx is installed on our remote servers. From our configuration above, we need the
nginx.conffile. We will install Nginx on our bastion host and get this configuration file.Once we get the file, we will copy its content and replace a similar file on the remote server.
Install Nginx on the bastion host
sudo apt install nginx -yNavigate to the
nginx.conffile and copy its content.sudo nano /etc/nginx/nginx.confMake a file and name it
nginx.tpl. Paste the content we just copied into this newly created file. With this configuration, we can now install Nginx.We will use PHP as the language to display the hostnames of our instances. We will create another role similar to the Nginx role we just made. This one will be called PHP. Add the configuration below to the second
main.ymlfile.#module to install and configure php --- - name: Install PHP apt: name: php state: present - name: Install PHP8.1-FPM apt: name: php8.1-fpm state: present update_cache: yes - name: Start and enable PHP8.1-FPM service: name: php8.1-fpm state: started enabled: yes - name: Configure Nginx to use PHP 8.1 copy: src: sites-enabled dest: /etc/nginx/sites-enabled/default - name: Copy php file from control machine to remote host copy: src: index.php dest: /var/www/html/index.php - name: restart nginx service: name=nginx state=restartedFrom this configuration above, we need files that will replace their equivalents on the remote servers.
The first file we will need is the
sites-enabledfile. This file will change the configuration of Nginx to allow PHP files to run on the server. Copy the configuration below.For some weird reason, the file couldn't be displayed on hashnode. Please copy it from my GitHub repository.
Create a file called
site-enabledand paste the configuration into that file. Let's move on to the second file calledindex.php. This file will hold our PHP code which will display the hostname of our instances.<html lang="en"> <head> <meta charset="UTF-8" /> <meta http-equiv="X-UA-Compatible" content="IE=edge" /> <meta name="viewport" content="width=device-width, initial-scale=1.0" /> <title>Nginx Server</title> </head> <style> * { margin: 0; padding: 0; box-sizing: border-box; } body, html { height: 100%; } body { color: white; font-family: "Courier New", Courier, monospace; } main { height: 100%; background: url("https://i.ibb.co/pRC65CX/markus-spiske-iar-af-B0-QQw-unsplash.jpg"); opacity: 0.8; display: flex; align-items: center; } h1 { font-size: clamp(4rem, 100vw, 2rem); margin-bottom: 1rem; } .container { padding-left: 2rem; } </style> <body> <main> <div class="container"> <h1 class="heading-text"> <?php echo "Hi, I'm a Server<br>"; ?> </h1> <h2> <?php $hostname = gethostname(); echo "My name is: $hostname"; ?></h2> <h3>ADD YOUR NAME</h3> </div> </main> </body> </html>With this, we have completely set up all our roles. Let's now set up our ansible playbook.
Our ansible playbook is the file that will hold all our roles. It contains the general configurations that will be applied to all the roles. Let's now create our playbook called
demo.yml.--- - hosts: all become: true roles: - nginx - phpTo make all our configurations come to life, we must execute them. To run our configurations, we use the following command:
ansible-playbook -i host-inventory demo.ymlOur playbook should execute looking like figure 24
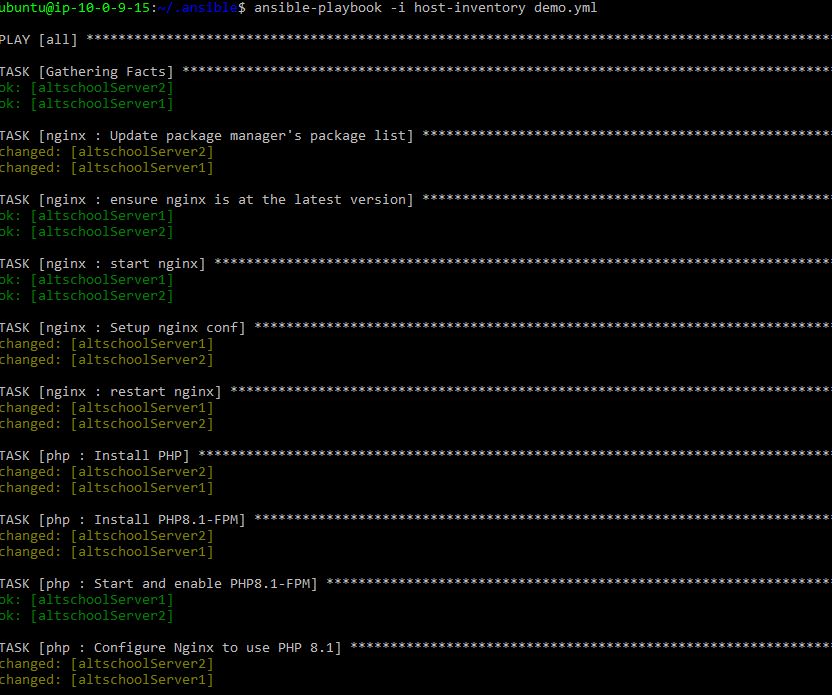
Figure 24. Execution of the Ansible playbook.
Installing and configuring Nginx automatically using Ansible is a beautiful feeling, some consider it art. But don't tell that to the sysadmin who has to debug it when something goes wrong!
We have installed and configured Nginx; let us move to step three. It is the final step of the project in which we will create our ALB.
Step 3: Setup the Application Load Balancer(ALB)
This step deals with setting up an ALB, and the goals of this step include the following:
Set up a target group.
Set up the ALB.
Let's proceed to understand what an ALB is.
What Is an Application Load Balancer?
An application load balancer (ALB) distributes traffic between multiple EC2 instances. It acts as a single URL that will display the content in both instances, increasing the availability of your application.
The first thing we will do in this step is to create a target group. It is what tells the ALB where to direct traffic. Let's begin now.
Navigate to the EC2 console, and locate the target group section.
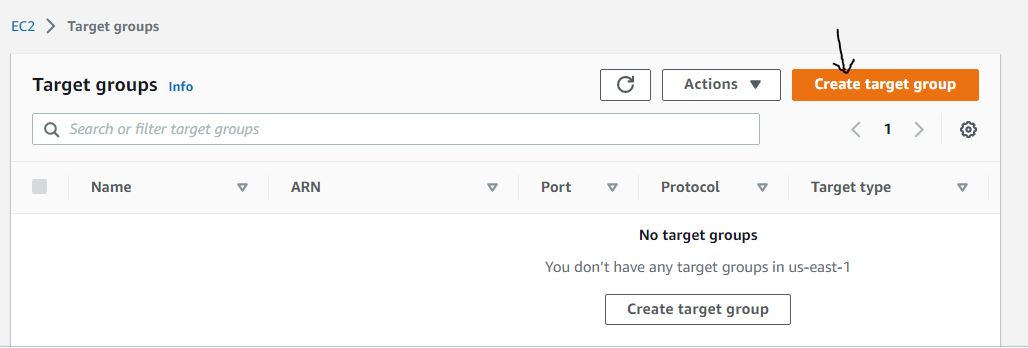
Figure 25. Target group console.
Adhering to configurations as shown below, set up the target group.
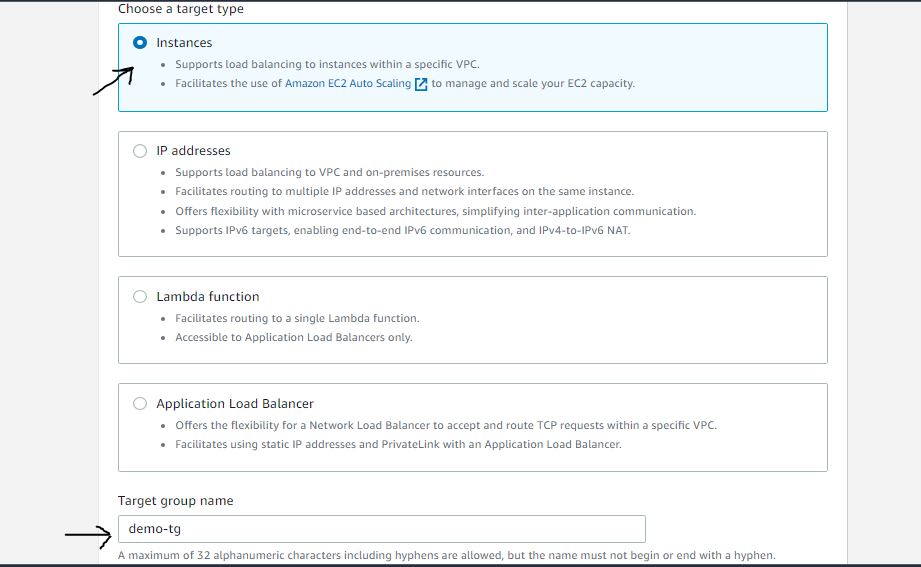
Figure 26. Configure target group step 1.
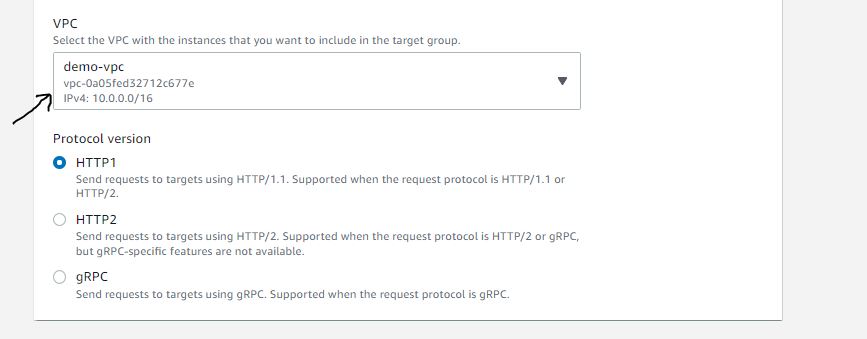
Figure 27. Configure target group step 2.
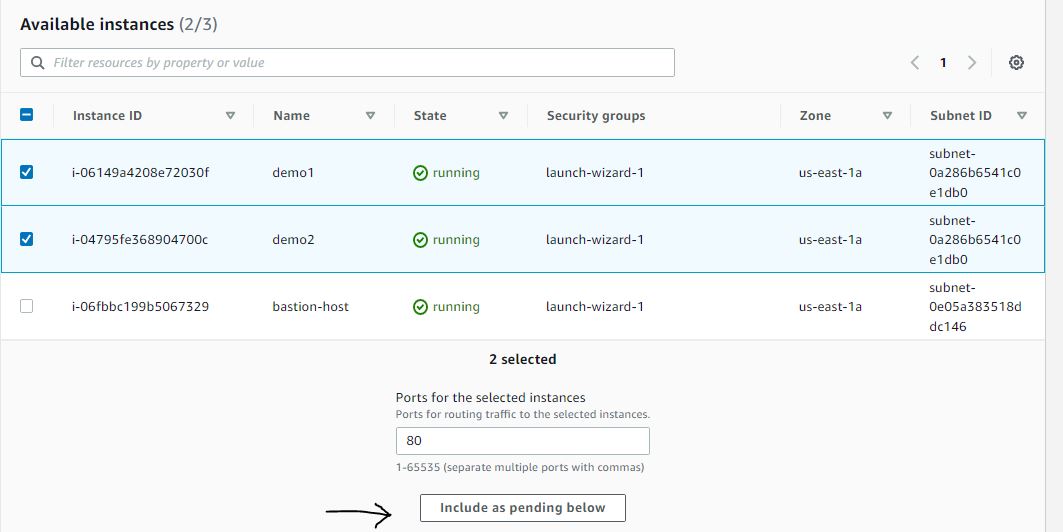
Figure 28. Configure target group step 3.
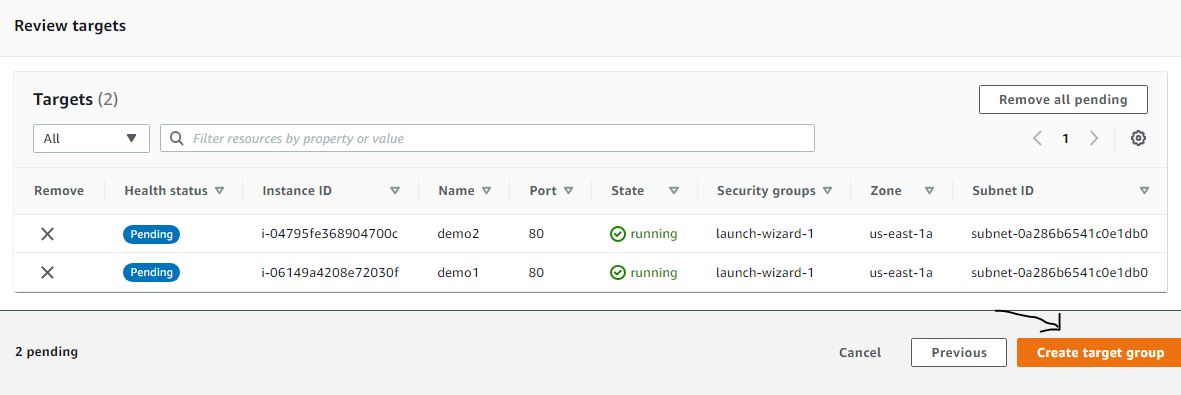
Figure 29. Configure target group step 4.
With this, you should have a target group nameddemo-tg. Confirm that your target group is like figure 30.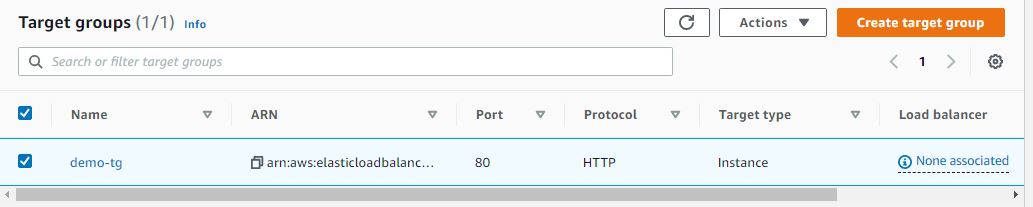
Figure 30. Confirm target group.
We have our target group now; let us create a load balancer associated with that target group.
The following configurations can be used to set up an ALB.
Navigate to the load balancer menu and click the create load balancer button.
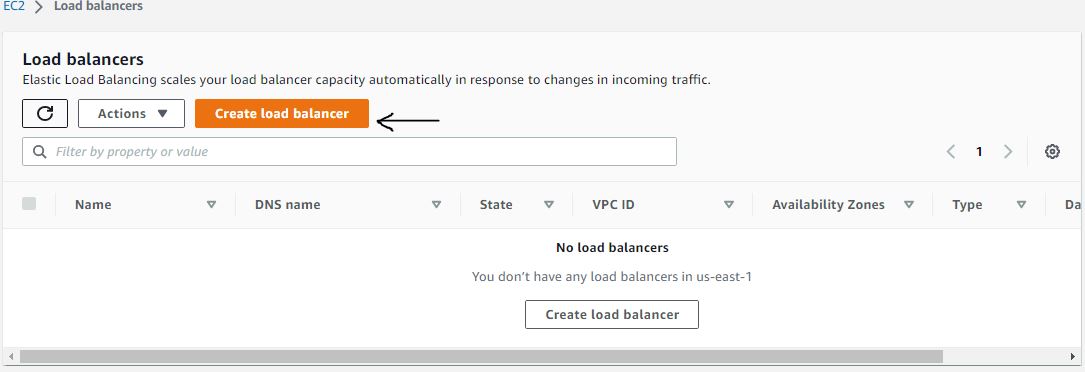
Figure 31. Create a load balancer.
Choose the application load balancer option.
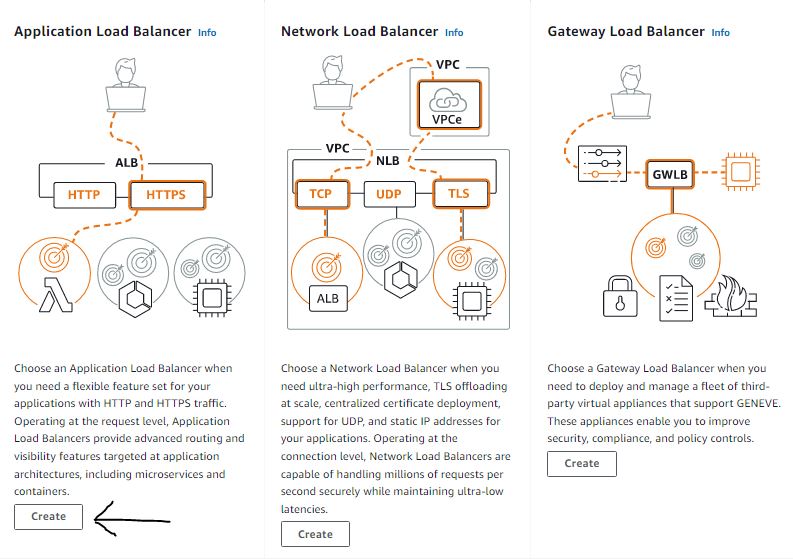
Figure 32. Configure load balancer step 1.
Adhering to the configurations shown below, we will create our ALB.
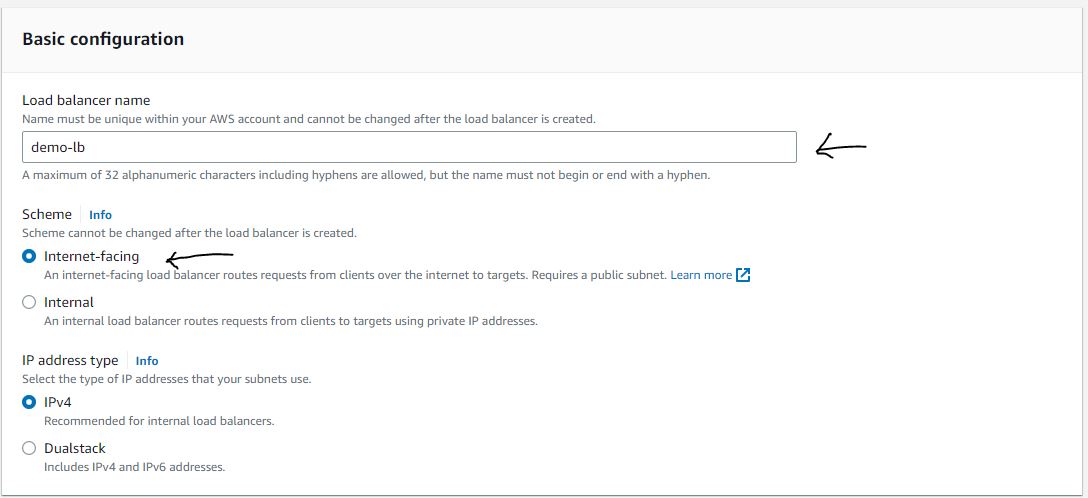
Figure 33. Configure load balancer step 2.
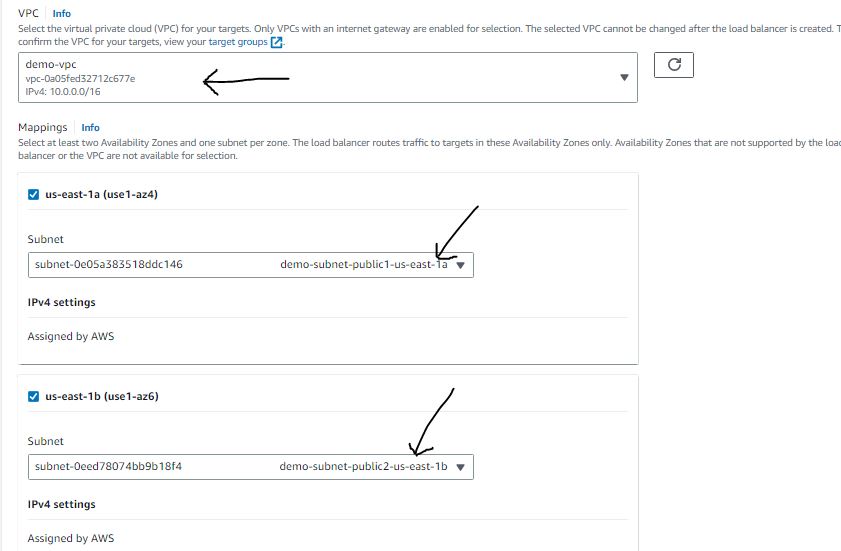
Figure 34. Configure load balancer step 3.
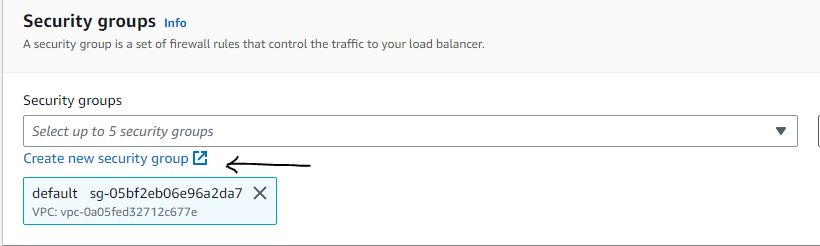
Figure 35. Configure load balancer step 4.
From figure 35, we will open another tab to create a new security group for our ALB.
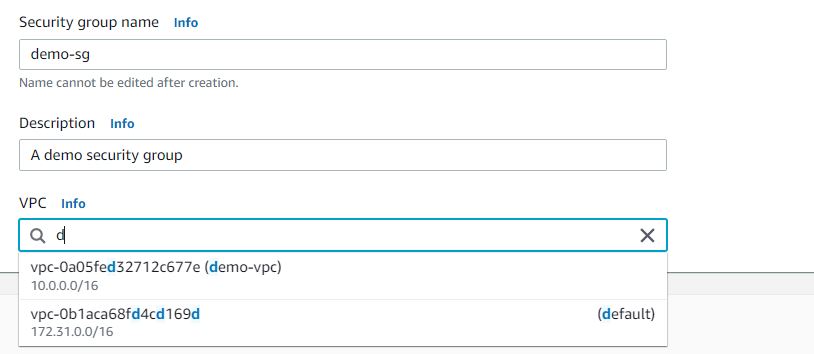
Figure 36. Create an ALB security group.
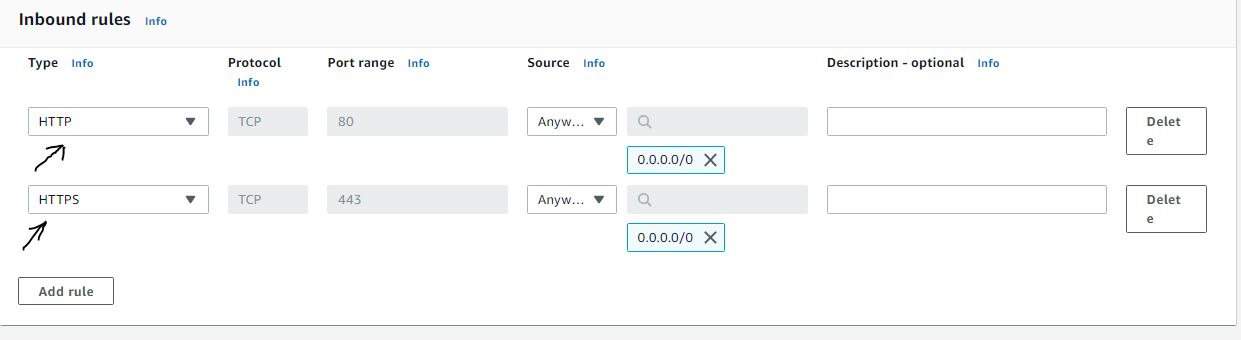
Figure 37. Set the inbound rules for the ALB security group.
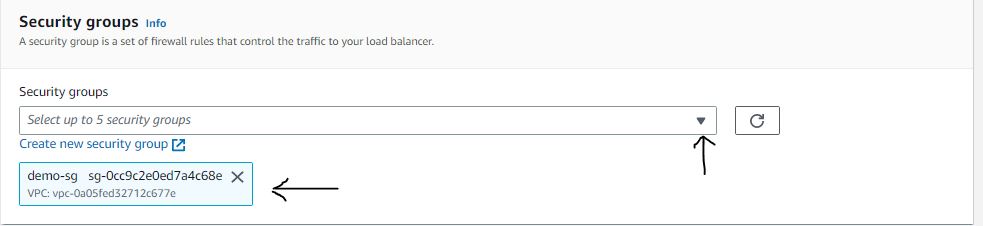
Figure 38. Configure load balancer step 5.
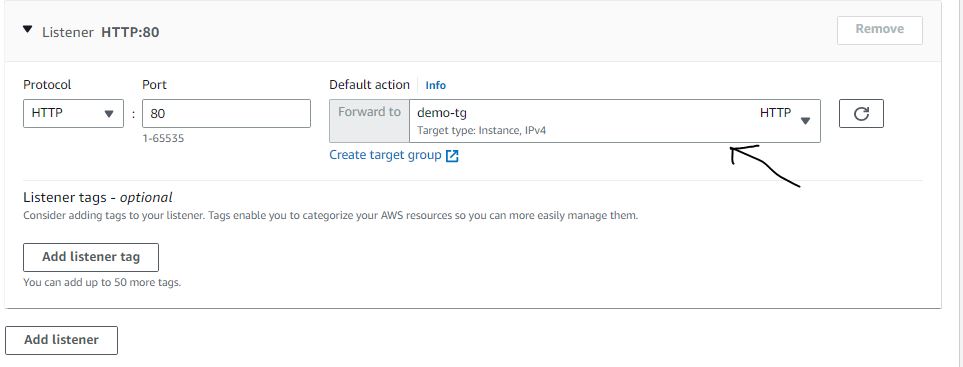
Figure 39. Configure load balancer step 6.
With this, we have created our load balancer. The last thing we have to do is configure the security group of our EC2 instances.
The following steps are used to configure our EC2 instances security group:
Please navigate to the security groups menu and select the security group for our instances.
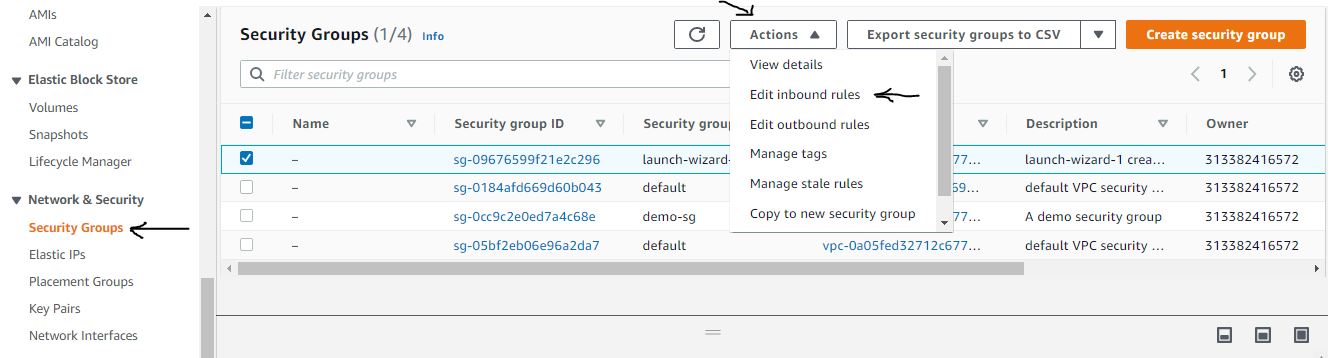
Figure 40. Configure security group step 1.
Edit the inbound rules to allow HTTP traffic from the load balancer's security group.
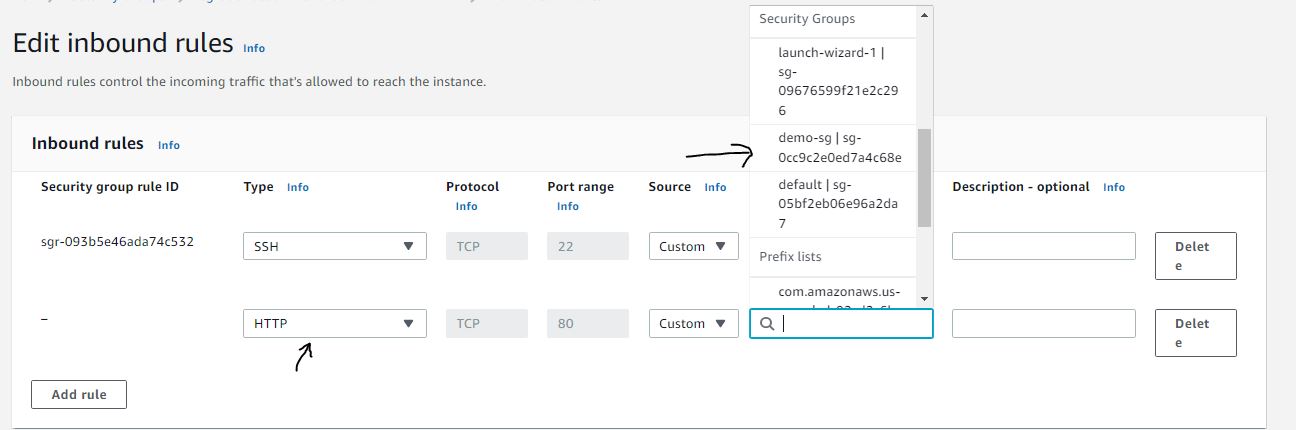
Figure 41. Configure security group step 2.
We will now confirm the health of our instances. To do this, use the following steps:
Navigate to the target group console and click on your created target group. Scroll down, and you will see a table similar to figure 42

Figure 42. The health of your instances.
Note: If your instances are unhealthy, you will have to wait for a few minutes, and if nothing changes, you will have to restart the Nginx service.
Voila, we are done! To see our live project, navigate to the load balancer console, copy the URL, and paste it into your browser.
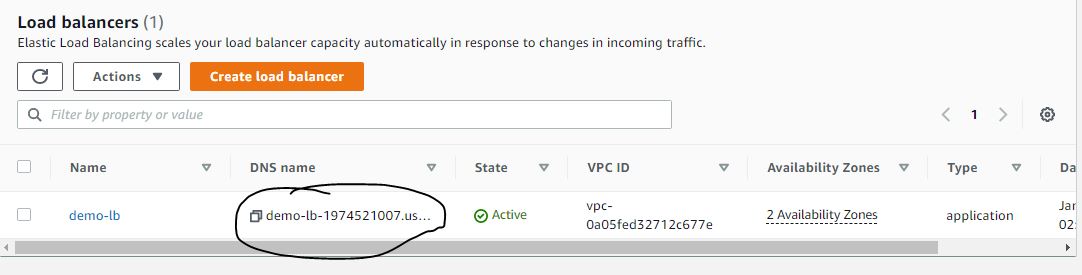
Figure 43. Load balancer URL.
You should see our completed project as seen in the following images below:

Figure 44. Server 1.

Figure 45. Server 2.
To see the changes refresh the page and take note of the changes in the IP addresses.
We have successfully installed the Nginx web server on private instances using ansible and an ALB.
For cost management, It is advisable to use AWS's free tier services, as displayed in this tutorial. However, we will incur some charges if this project is left running for some time. Therefore, you will have to quickly shut down all the services we created during this project.
Conclusion
In conclusion, deploying a web server on AWS can be challenging for those new to cloud engineering. However, it is easy to deploy and manage a web server by following a hands-on approach and utilizing the various tools and services provided by AWS.
One of the most significant advantages of using AWS is the availability of free-tier resources. It allows users to test and experiment with the platform without incurring additional costs. Additionally, a wealth of information is available online for those who wish to dive deeper into the topics discussed in this article, such as Ansible and AWS.
With further research, you can unlock AWS's full potential and take your cloud engineering skills to the next level. It's all just a few clicks away - so why not take the plunge and see where the cloud can take you? Thank you for reading!


